
Pada tutorial kali ini kita akan membahas bagaimana cara import data dari file excel ke database menggunakan codeigniter 4.Oke langsung saja ,kita menggunakan library bernama PHPExcel untuk membaca file excel.
Pertama download codeigniter4 dari situs resminya.Jika belum tau cara download atau memasangnya bisa dilihat disini
Download PHPExcel
Untuk library PHPExcel bisa didownload di link ini PHP EXCEL
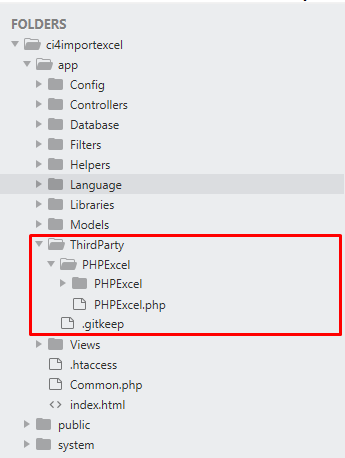
Langkah selanjutnya pindahkan file PHPExcel yang sudah diextract ke project codeigniter 4 kita ke folder app/ThirdParty.Sehingga struktur terlihat seperti gambar dibawah ini.
Struktur dan Setting Database
Kemudian buat database baru bernama latihanci4.Lalu kita akan buat tabel bernama contacts dengan struktur seperti dibawah.

Kemudian konfigurasi file .env dibagian database.Sesuaikan dengan settingan database teman-teman.
database.default.hostname = localhost
database.default.database = latihanci4
database.default.username = root
database.default.password = root
database.default.DBDriver = MySQLi
Setting AutoLoad ThirdParty
Langkah selanjutnya kita mengubah file di folder app/Config/Autoload.php agar plugin PHPExcel dapat digunakan di semua controller.Ubah file tadi menjadi seperti dibawah ini.
| |
Bagian yang dirubah di array $classmap di baris 74,kita tambahkan lokasi plugin kita yang difolder ThirdParty.
Membuat Model
Buat file baru bernama ContactModel.php di folder app/Models/ContactModel.php dan tulis kode dibawah.
<?php namespace App\Models;
use CodeIgniter\Model;
class ContactModel extends Model
{
	protected $table = 'contacts';
	protected $primaryKey = 'id';
	protected $allowedFields =['nama','handphone','email'];
}
Membuat Controller
Kita akan menggunakan controller bawaan Home yang berada di folder app/Controllers/Home.php.
Akan dibuat 2 fungsi ,pertama index untuk menampilkan view dengan data contact dan prosesExcel untuk membaca excel dan menyimpan ke tabel.
Untuk memanggil fungsi thirdParty agar bisa digunakan menggunakan perintah seperti dibawah ini.
| |
Karena sudah dibuat di autoload kita tinggal memanggilnya menggunakan perintah use.
Untuk kode full untuk controller Home bisa dilihat dibawah ini.
<?php namespace App\Controllers;
use PHPExcel;
use PHPExcel_IOFactory;
use App\Models\ContactModel;
class Home extends BaseController
{
public function __construct(){
$this->contact = new ContactModel();
}
public function index(){
$data['contacts'] = $this->contact->findAll();
echo view('index',$data);
}
public function prosesExcel()
{
$file = $this->request->getFile('fileexcel');
if($file){
$excelReader = new PHPExcel();
//mengambil lokasi temp file
$fileLocation = $file->getTempName();
//baca file
$objPHPExcel = PHPExcel_IOFactory::load($fileLocation);
//ambil sheet active
$sheet = $objPHPExcel->getActiveSheet()->toArray(null,true,true,true);
//looping untuk mengambil data
foreach ($sheet as $idx => $data) {
//skip index 1 karena title excel
if($idx==1){
continue;
}
$nama = $data['A'];
$hp = $data['B'];
$email = $data['C'];
// insert data
$this->contact->insert([
'nama'=>$nama,
'handphone'=>$hp,
'email'=>$email
]);
}
}
session()->setFlashdata('message','Berhasil import excel');
return redirect()->to('/home');
}
}
Untuk fungsi prosesExcel kita tidak perlu menyimpan file excel yang telah diupload terlebih dahulu.Kita akan gunakan data excel yang berada di folder tmp yang hanya bersifat sementara.
Membuat View
Buat file index.php di folder app/Views kemudian ketikkan kode dibawah.
<!DOCTYPE html>
<html lang="en">
<head>
	<meta charset="UTF-8">
	<title>Import Excel Codeigniter</title>
	<link rel="stylesheet" href="https://stackpath.bootstrapcdn.com/bootstrap/4.4.1/css/bootstrap.min.css">
</head>
<body>
	<div class="container mt-3">
		<?php
		if(session()->getFlashdata('message')){
		?>
			<div class="alert alert-info">
				<?= session()->getFlashdata('message') ?>
			</div>
		<?php
		}
		?>
		<form method="post" action="/home/prosesExcel" enctype="multipart/form-data">
			<div class="form-group">
				<label>File Excel</label>
				<input type="file" name="fileexcel" class="form-control" id="file" required accept=".xls, .xlsx" /></p>
			</div>
			<div class="form-group">
				<button class="btn btn-primary" type="submit">Upload</button>
			</div>
		</form>
		<table class="table table-bordered">
			<thead>
				<tr>
					<th>Nama</th>
					<th>Handphone</th>
					<th>Email</th>
				</tr>
			</thead>
			<tbody id="contactTable">
			<?php
			if(!empty($contacts)){
				foreach($contacts as $contact){
				?>
					<tr>
						<td><?= $contact['nama'] ?></td>
						<td><?= $contact['handphone'] ?></td>
						<td><?= $contact['email'] ?></td>
					</tr>
				<?php
				}
			}else{
			?>
				<tr>
					<td colspan="3">Tidak ada data</td>
				</tr>
			<?php
			}
			?>
			</tbody>
		</table>
	</div>
</body>
</html>
Kita menggunakan bootstrap 4 yang online untuk membuat tampilan.Form action diarahkan ke controller Home fungsi prosesExcel.
Ketika membuat form upload file jangan lupa untuk menambahkan attribut berikut enctype="multipart/form-data”.
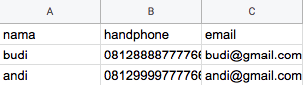
Untuk format excel yang diupload seperti dibawah ini.
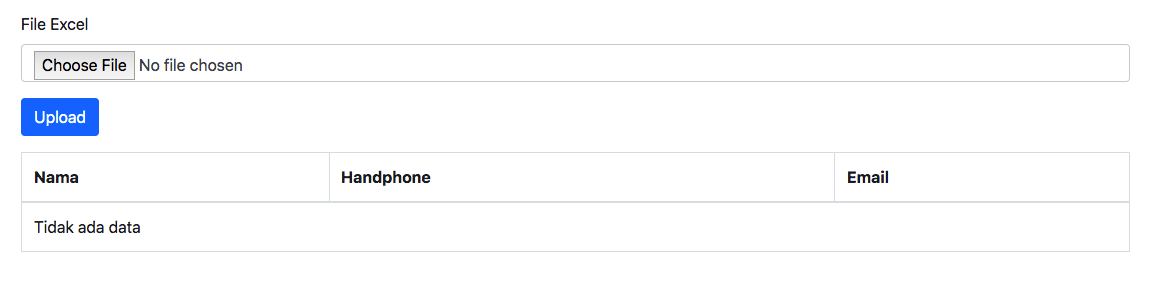
Kemudian coba jalankan dengan masuk ke direktori project melalui CMD/Terminal dan ketik php spark serve.Jika tidak ada kesalahan maka akan tampil seperti gambar ini.
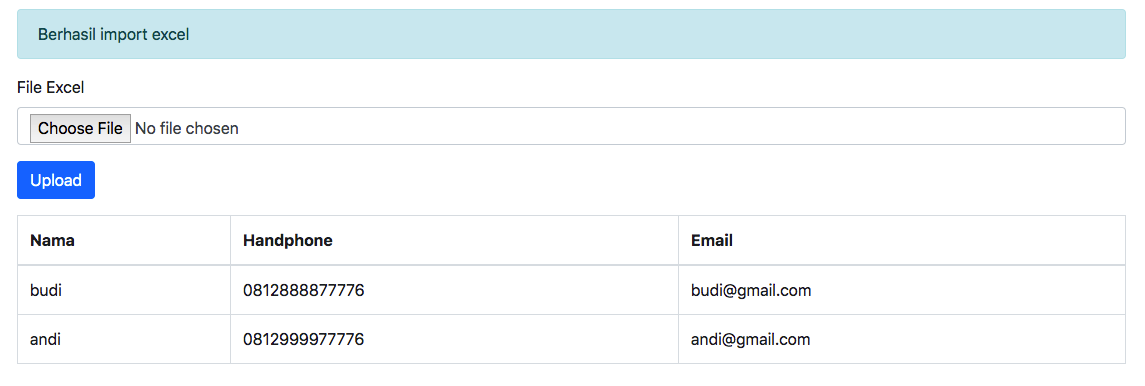
Kemudian coba upload file,jika berhasil maka data akan masuk dan tampil pesan seperti gambar dibawah ini.
Untuk kelanjutan tutorial ini akan dibuat Import Data Excel Menggunakan Ajax di Codeigniter 4.Sekian tutorial kali ini,jika mengalami kesulitan silahkan bertanya dibawah.